Open Broadcaster Software (OBS) Settings
Open Broadcaster Software (OBS) is a free software for live broadcasting with ability to manage audio and audio sources.
You can download Open Broadcaster Software using this link: http://obsproject.com/download
Getting Started and Setup
After downloading OBS, navigate to your settings by clicking Settings > Settings or clicking Settings on the bottom right button menu. A screenshot demonstrating this is below:
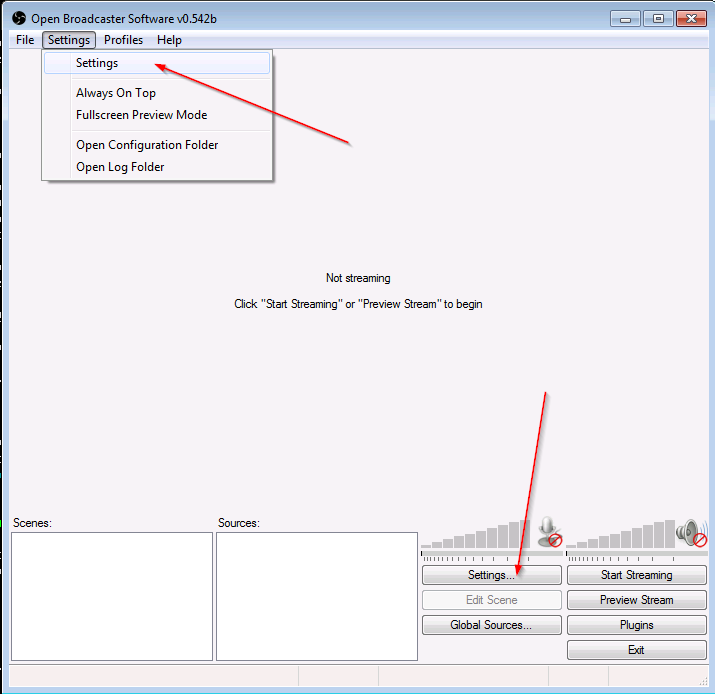
"General" settings.
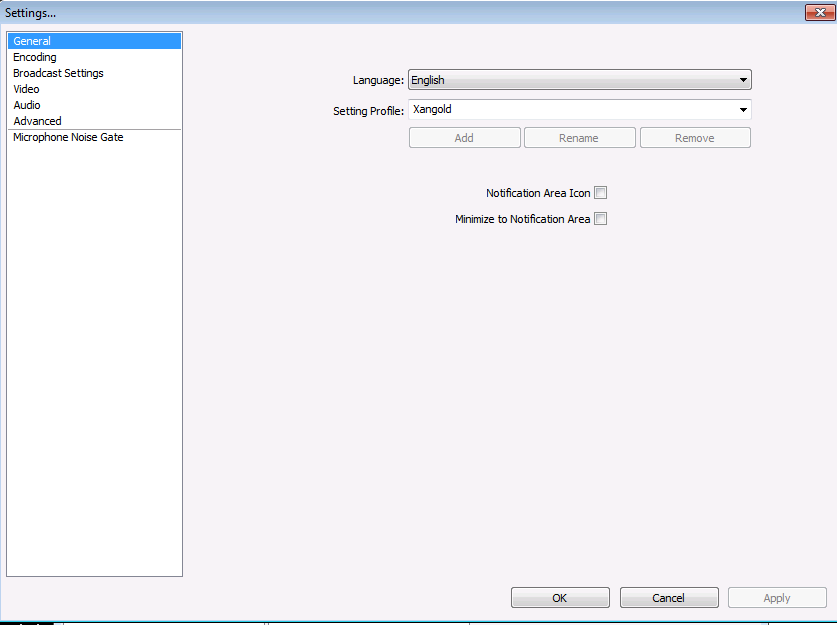
1. Select your language, and set a profile name.
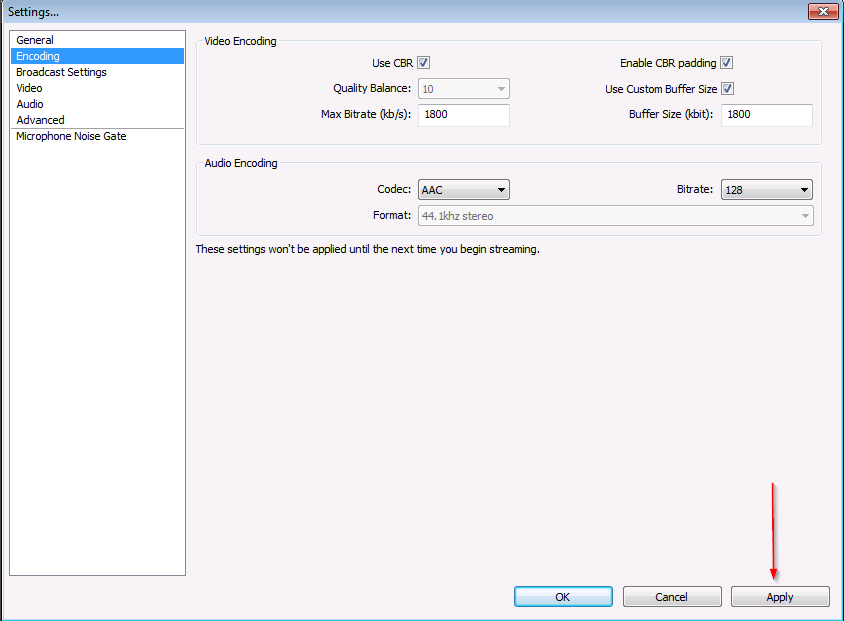
Encoding Settings
1. Check "Use CBR"
2. Check "Enable CBR padding"
3. Max bitrate should be 3300 or 80% of your upload throughput, whichever is lower. Recommended bitrates for different resolutions are listed below.
4. Buffer Size is recommended to be equal to the max bitrate. Setting this lower will have the encoder closer to the targeted bitrate. We do not recommend changing this unless you know what you are doing.
- Recommended bitrate for 1080p: 3000-3500
- Recommended bitrate for 720p: 1800-2500
- Recommended bitrate for 480p: 900-1200
- Recommended bitrate for 360p: 600-800
- Recommended bitrate for 240p: Up to 500
Audio Encoding:
1.We recommend AAC with a bitrate of 64-128, although this is up to personal preference and bandwidth constraints. This is an example of what it should look like after you are done:
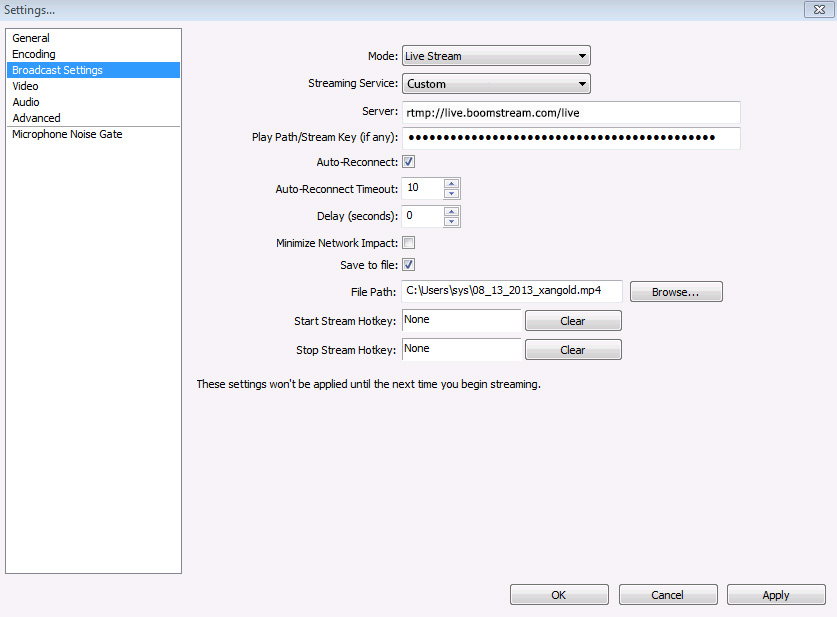
Broadcast Settings
1. Mode: Live stream
2. Streaming Service: Custom
3. Server: rtmp:/ /live.boomstream.com/live
4. Play Path/Stream Key:
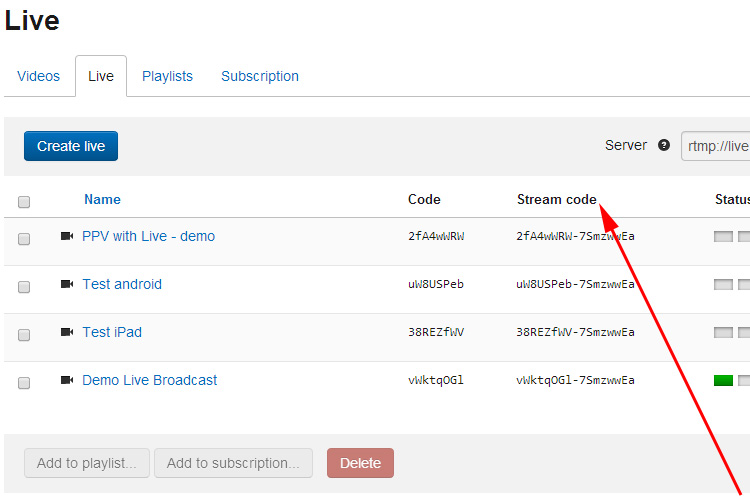
1. Autoreconnect: Recommended checked.
2. Auto-Reconnect Timeout: 10 seconds
3. Delay: 0, but if you need delay set locally you can do this to prevent "ghosting." We do NOT recommend delay.
4. Minimize Network Impact: Unchecked. If you are an advanced user, or are having issues with your network settings, use this setting.
5. Save to file: We HIGHLY recommend you keep local recordings on your computer as we make changes to our VOD storage, to ensure you always have easy access to your broadcasts.
6. File Path: Select a file path for where you want to save your local files. Not needed if you do not save a local file.
7. Start Stream Hotkey: Custom key to start stream with.
8. Stop Stream Hotkey: Custom key to stop stream with. An example of what this would look like is below:
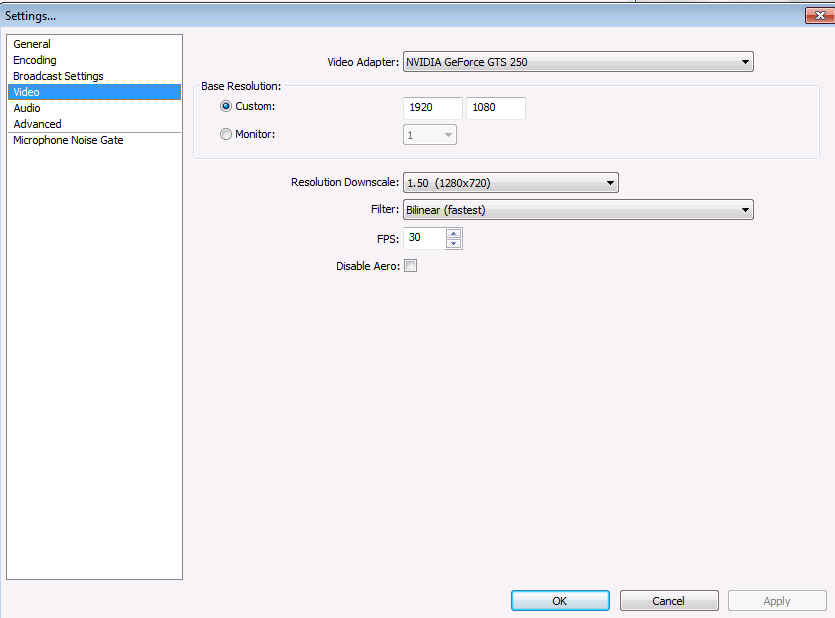
Video settings
1. Video Adapter should be set by default. If you have more than one, select the adapter you are playing your game on.
2.Base resolution typically is your monitors resolution. You can alternatively select a monitor to default this.
3. Resolution Downscale is the resolution that you send our servers. Lower resolutions will consume less bandwidth overall, and use much less processing power.
4. Filter should be "Bilinear" unless you have issues with blurring in your downscaling. Bicubic and Lanczos are both supported, but will take additional processing.
5. FPS is recommended to be 30. Note that 720p at 60 frames per second for some games will look better than low bitrate 1080p at 30 FPS.
6. Aero is recommended to be disabled only if you are using monitor or screen capture.
Audio settings
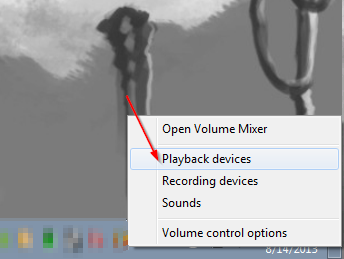
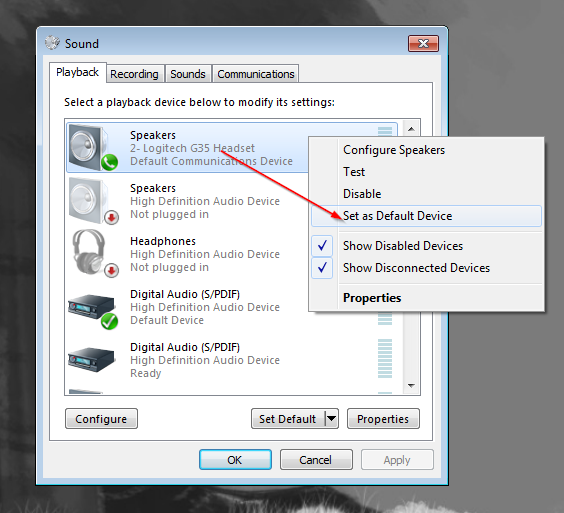
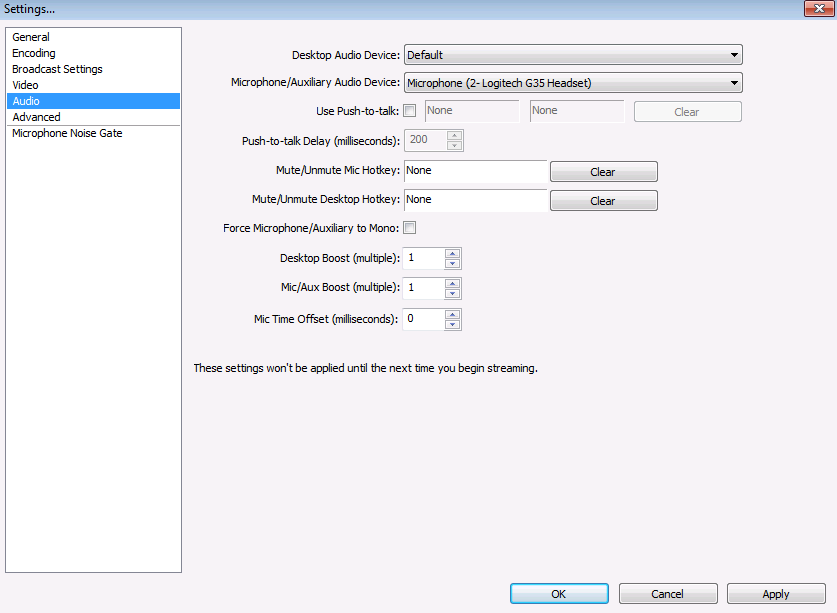
1. Desktop Audio Device: We recommend that this be set to your "Default" playback device. To change this, right click on your volume slider, then click playback devices. Then, right click on the audio device you'd like to make default and select "Set as Default Device." Two images will show that process below:
2. Microphone/Auxiliary device: Set this to your headset or microphone if you have one.
3. Use Push to talk: Set this if you want push to talk set to a custom key.
4. Push to talk delay: Time after key is released and OBS is still recording your mic.
5. Mute/Unmute mic hotkey: User preferred hotkey to toggle mute settings for the Microphone/Auxiliary device.
6. Mute/Unmute Desktop Hotkey: User preferred hotkey to toggle mute settings for the Desktop Audio Device.
7. Force Microphone/Auxiliary to Mono: If you want this to only use one channel. We do not recommend this.
8. Desktop Boost (multiple): Force OBS to boost your desktop audio. 1 is "100%"
9. Mic/Aux Boost (multiple): Force OBS to boost your microphone audio. 1 is "100%"
10. Mic Time Offset (ms): Default 0. Use this if you have sync issues. An example of this page filled out is below:
Advanced tab
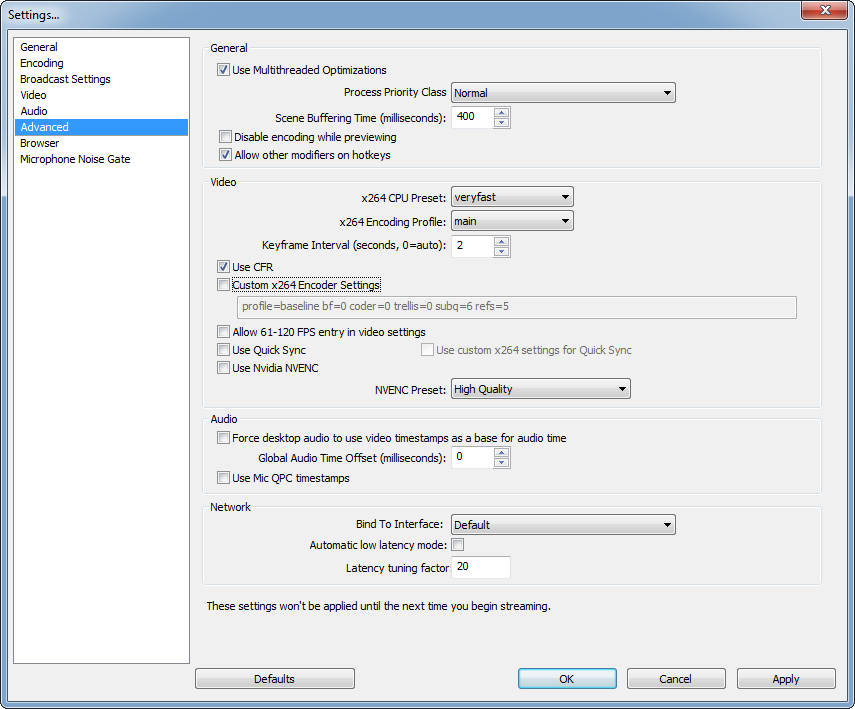
1. Use multithreaded Optimizations: Checked
2. Process Priority Class: Normal. Changing this higher will make OBS get CPU before other programs and can cause lag on many systems. Scene Buffering Time (ms): 400
3. Disable encoding while previewing: Unchecked unless you have lag while previewing your stream.
4. Allow other modifiers on hotkeys: Checked Video
5. x264 CPU Preset: This will set the encoding level. We recommend "veryfast" unless you have no bandwidth and beastly computer. Then, set it to be slower. Warning: setting your stream to a lower setting when at a high resolution is very CPU intensive.
6. x264 Encoding profile: This setting changes what profile you record on. Some devices (notably tablets and phones) may have issues with decoding streams with "high" profiles, so we recommend main if you want to have the highest compatibility at the sacrifice of some quality.
7. Use CFR: Checked [newer versions may not need this!]
8. Custom x264 Encoder Settings: Default (blank)
9. Keyframe Interval: Set this to 2
10. Allow 61-120 FPS entry in video settings: Unchecked. We don't recommend users going above 60FPS for any game.
11. Use Quicksync: If you have certain Intel processors (Sandy Bridge/Ivy Bridge), you can use this alternative method of encoding to use less CPU (it will use the hardware video encoder on your integrated GPU). There are quality differences due to the change of encoding. This nullifies x264 presets, but you can set the custom encoding settings if you want by checking "use custom x264 settigns for Quick Sync"
12. Use Nvidia NVENC: Similar to quicksync, this uses an alternative encoding method, with quality differences (usually lower at the same bitrate) due to the change of encoding. There are several presets you can choose from with this using the NVENC Preset dropdown.
13. Sub-options of Use Quick Sync and Use custom x264 settings for QSV should remain unchecked.
Audio
1.Force desktop audio to use timestamps as a base for audio time: Check this if you are having problems with syncing only.
2. Global audio Time Offset (ms): Set this to the number of ms you'd like to offset this to. We recommend 0 unless having issues with sync.
3. Use Mic QPC timestamps: Use this only if having sync issues.
Network
1. Bind to Interface: Default. You can select another network adapter here if you need to.
2. Automatic low latency mode: Check this only if you've talked to a OBS developer or Twitch staff as very few users would need this.
3. Latency tuning factor: Set this only if you've talked to a OBS developer or Twitch staff as very few users would need this. An example of what this would look like for a user is below:
Microphone noise gate settings
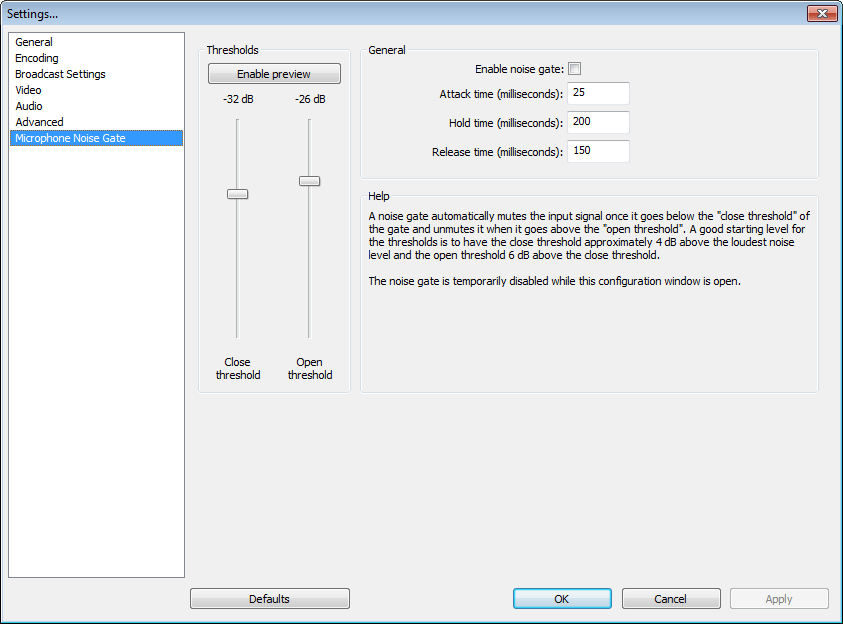
This setting allows users to set an automatic threshold for their mic being turned on and off. You can select the decibel level of the Close and Open thresholds here.
1. Attack Time: This is the time it takes for your mic to "spin up" to reach hold to output.You generally do not modify this.
2. Hold time(ms) how long the gate will stay open after it falls below threshold. You generally do not modify this.
3. Release time: Inverse of attack time. You generally do not modify this. Our recommended "off" settings are found below:
Now, you are ready to add scenes, and then sources to those scenes.
Scenes and Sources
Scenes and sources within OBS are fairly simple to add, and highly customizable. Generally, we recommend that you add as little dynamic content such as screen regions as possible due to the fluctuating nature of whats on your screen. Broadcasting a game directly or through a window is the recommended setup, although this is not compatible with every game or system.
1. To add a scene, right click the blank space under "Scenes" in the main OBS window, then click "Add Scene"
2. Enter a descriptive name such as "League of Legends in Game"
Next, make sure you have your scene selected, and right click the white space under the Sources header.
Source: Window Capture
1. Make sure that Aero is enabled, as this will not capture a specific layered window if not enabled.
2. Add a descriptive name like "Microsoft Paint"
3. Window: Under the window dropdown, select the correct program. In our example, it will be Untilted - Paint.
4. Innter/Outer Window: We want to select the header/title as well as whats inside the box, so we will select Entire Window. If you don't want the outside edge of the window, select Inner window.
5. Capture Mouse Pointer: Check if you want a mouse pointer in the source.
6. Compatibility mode: This generally is for when you don't want certain programs being caught with your stream. Leave this unchecked unless you have programs with 3rd party programs like Stream Privacy or performance issues.
7. Gamma: You can adjust the gamma of the scene. Recommended to leave this at 1.
8. Use point filtering: Use this if you are wanting to upscale your source in OBS only.
9. Opacity: You can set the transparency/opacity of this source in OBS. Sub Region:
10.Sub-Region: This is an option to capture only a certain portion of a window. Check this if you only want part of a window, such as the drawing portion. We will leave this unchecked since we want the whole window as previously noted.
11. If you do want it, you can select the region using the mouse pointer, or select the coordinates manually.
Color Key:
1. This is also known as a chroma key. Use this to select parts of windows based on their color.
2. Color: Select the color you want to select in your window
3. Similarity 1-100: Select the similarity. IE blue to sky blue, royal blue, turquoise, etc.
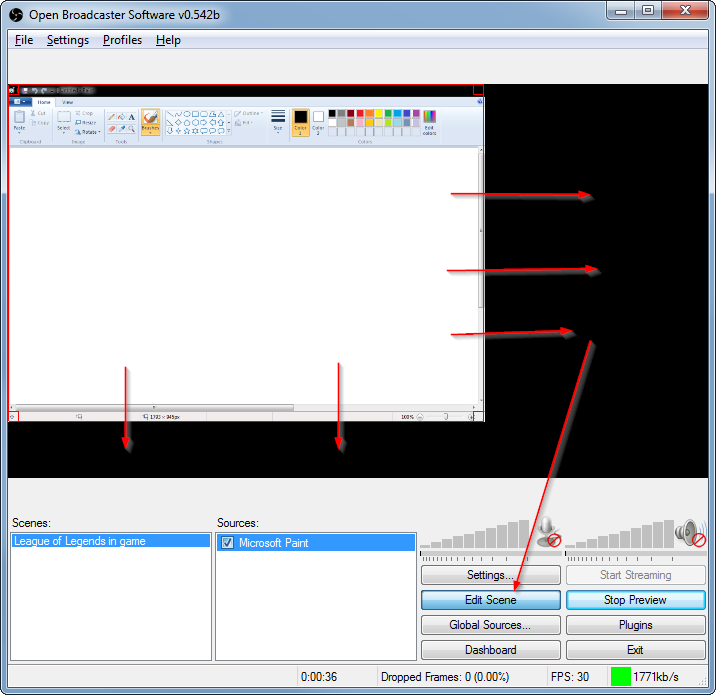
4. Blend: Select the sharpness of the chroma key edges. Finishing up and looking at it: Click "Ok". Click "Preview stream" on the bottom right button menu in the main OBS screen. Note that the window is not taking up the entire screen. Click "Edit Scene" on the bottom right button menu in the main OBS screen.
Example of our Paint Window Capture:
Source: Monitor Capture
Monitor Capture is a capturing tool that allows you to capture a monitor's output. This is useful for quickly getting started streaming, but is generally not recommended outside of ease of use due to several security (information shown) and production issues. Do NOT use Aero when using this as a primary capture means, as it has significant performance drawbacks when using Aero.
1. Monitor: Select the monitor you'd like to capture, listed by number.
2. Capture Mouse Pointer: Check if you want a mouse pointer in the source.
3. Compatibility mode: This generally is for when you don't want certain programs being caught with your stream. Leave this unchecked unless you have programs with 3rd party programs like Stream Privacy or performance issues.
4. Gamma: You can adjust the gamma of the scene. Recommended to leave this at 1.
5. Use point filtering: Use this if you are wanting to upscale your source in OBS only.
6. Opacity: You can set the transparency/opacity of this source in OBS.
Sub Region:
1. Sub-Region: This is an option to capture only a certain portion of a window. Check this if you only want part of a window, such as the drawing portion. We will leave this unchecked since we want the whole window as previously noted.
2. If you do want it, you can select the region using the mouse pointer, or select the coordinates manually.
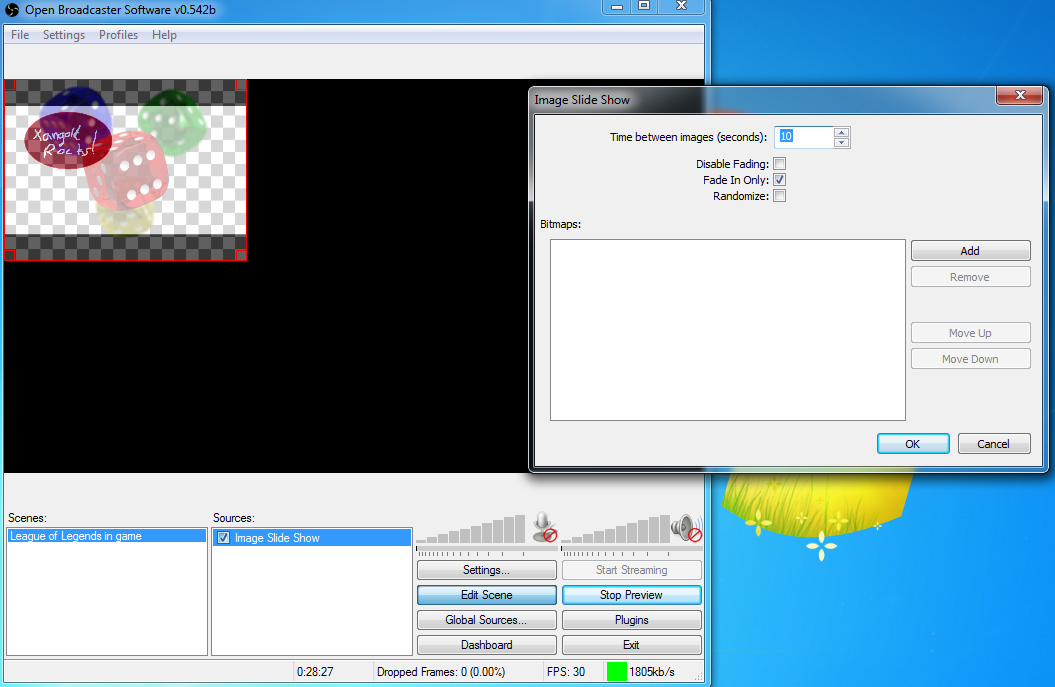
Source: Image Slideshow
An Image slideshow is a set of pictures that change periodically. This is usually used for advertisements, although serves many different purposes.
1. Time between images (seconds): Time between changes in photos.
2. Disable fading: Check this if you want a cut to the next image rather than a fade.
3. Fade in Only: Uncheck if you want it to fade out and in.
4. Randomize: Check this if you want the next picture shown to be random.
5. Add Button: Add to select pictures
6. Remove Button: Remove images from queue
7. Move up: Change order of a picture upwards in queue
8. Move Down: Change order of a picture downwards in queue
A screenshot below demonstrates the slide show in action and the settings used.
Source: Text
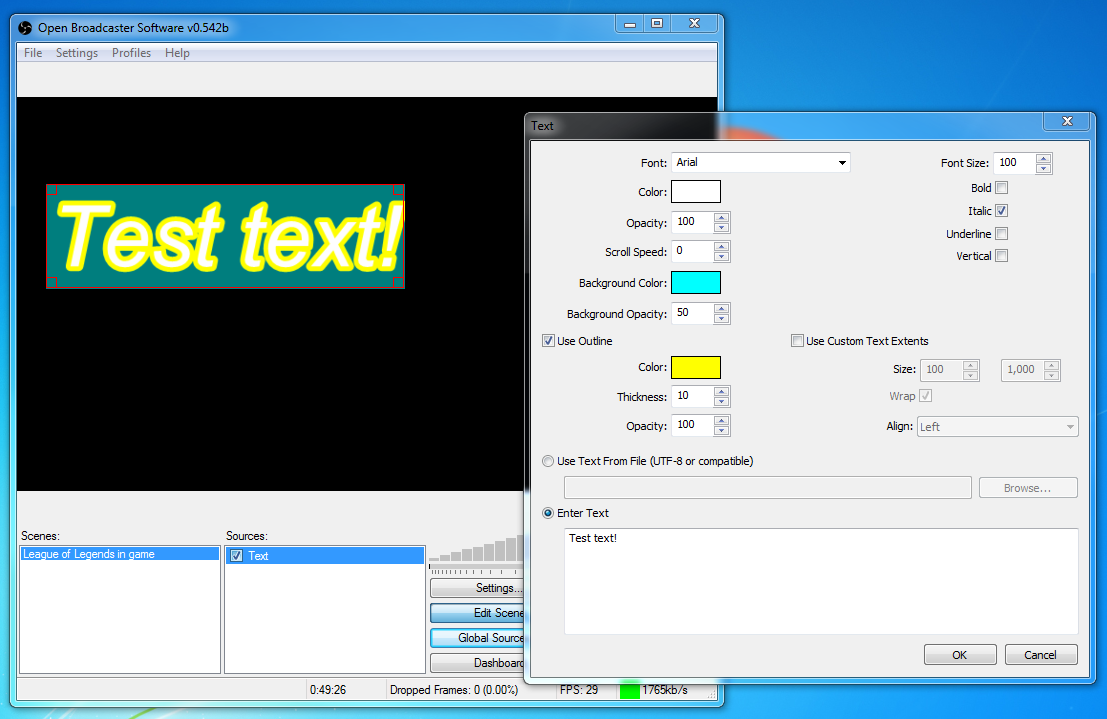
Text sources are about what they sound like: text with manipulation.
1. Font: Font for your text
2. Color: Color of your text
3. Opacity: Transparency/Opacity of text
4. Scroll Speed: How fast text will scroll across the screen. Higher speeds are hard to read!
5. Background color: Set a background color for the text to be on (rectangular). Background opacity: Transparency/Opacity of background color
6. Use Outline: Set a outline for the text (not background box). Outline color: Color of the outline around text. Thickness: Thickness of the outline. Opacity: Transparency/Opacity of outline
7. Font Size: Set size of the text. We recommend larger fonts downscaled as opposed to upscaled small fonts.
8. Bold/Italic/Underline General text settings
9. Vertical: Place letters vertically stacked as opposed to horizontally across screen
10. Use custom text extents: Check this if you want your long text to be constrained to a smaller source size, or if you want your small text. We recommend this only for dynamic (scrolling or dynamic files) text. Size is size of extent in pixels. Wrap checked is if text wraps in side extent. For example: (start of extent) testing 123 testin (end of extent). Align: Align text to left/center/right. Only supported if using extent and wrapping.
11. Use text from File: Select this to have text come from a file. Useful for chatting capture or other dynamic data. This is an example (and properties) of a text source.
Source: Video Capture Device
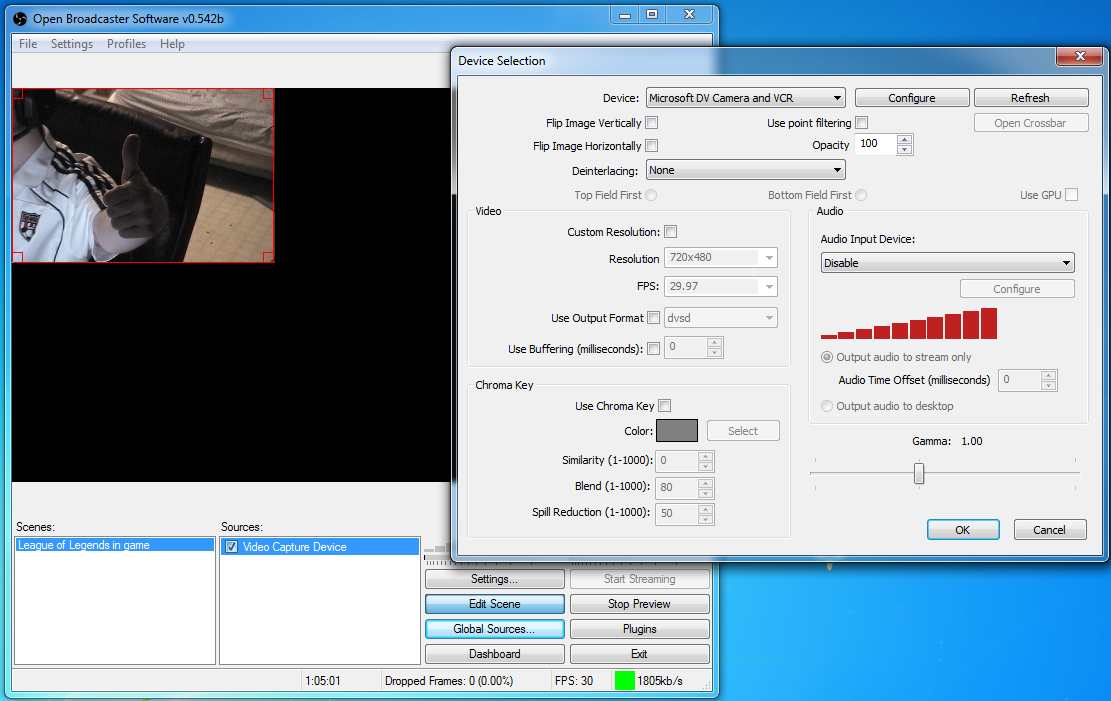
These are webcams, DV cameras, and notably most capture cards will have output in this source.
1. Device: Select device here
2. Flip Image Vertically/horizontally: Flip image either mirrored down, or sideways
3. Deinterlacing: If your source has lines or computorized disortion in it, select this and a method. Methods are dependent on the video source, and vary widely. Top Field/Bottom Field first: Start deinterlacing from top or bottom. We recommend top generally.
4. Custom Resolution: Select only part of a camera or video source here.
5. FPS: We recommend 29.97 for most source inputs. This depends on your capture card or camera's settings however. Please use native framerates.
6. Use output formats: Change how the video source is output. Some cameras have additional functions if set to certain output formats.
7. Use Buffering (ms): Buffer video. Recommended not turned on unless you are having major issues and are technically inclined.
8. Chroma Key: Use this to select parts of windows based on their color. Color: Select the color you want to select in your window. Similarity: Select the similarity. IE blue to sky blue, royal blue, turquoise, etc. Blend: Select the sharpness of the chroma key edges. Spill Reduction: Use this if you're getting reflections off of objects onto normally not color keyed objects such as a background tinting someone's hair.
9. Audio: Audio Input Device: Have a secondary audio feed from your video source. Generally recommended for capture cards if only if you are capturing console output. Not recommended on for video and webcams or PC output. Output Audio to stream only: Set it to capture internally to stream. Output audio to desktop: Externally capture it to your desktop audio devices.
10. Gamma: Set this to adjust gamma. We recommend playing with this to make sure that it's correct, as video sources sometimes need adjusting vs other sources.
This is an example of a video taken from a super old DV camera connected via i1394 and it's settings.
Source: Game Capture
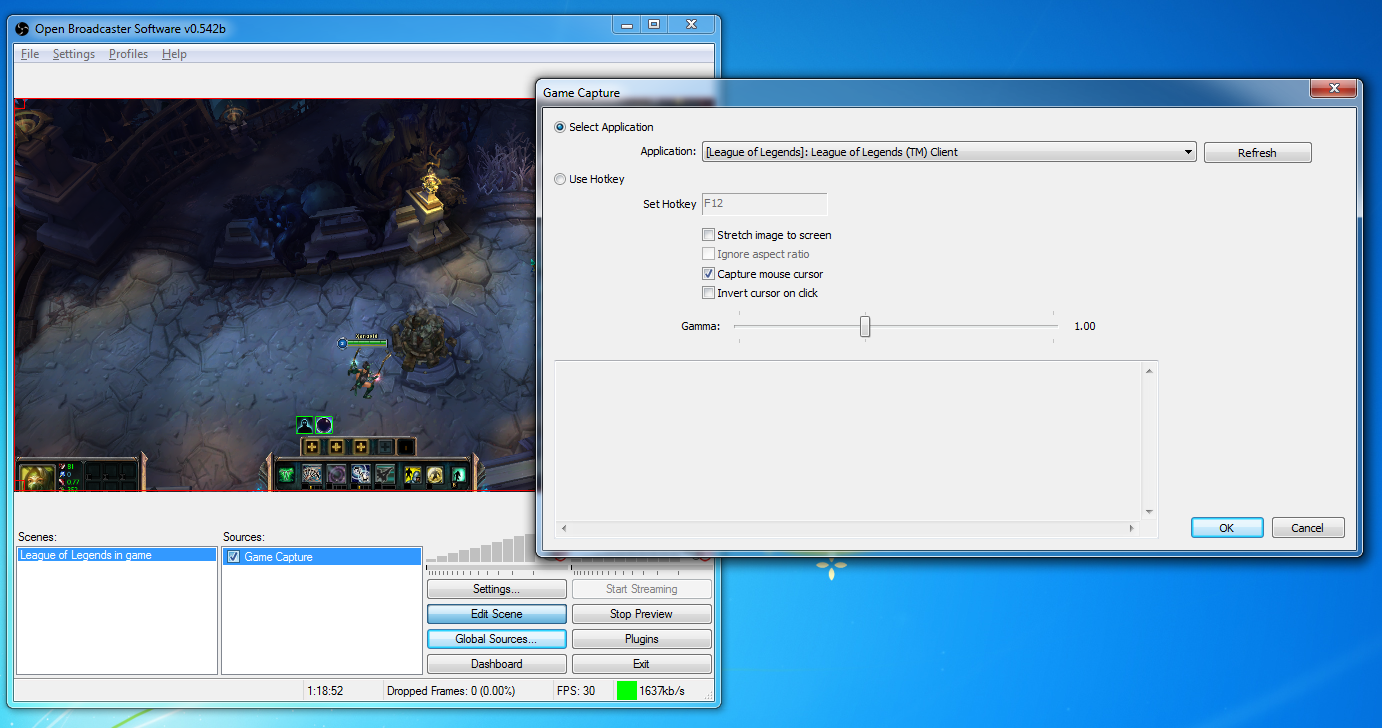
This is a source that directly captures your video output. It is very efficient when using Aero, and only captures the game itself. If you have difficulty getting your game to capture, try to use 32-bit OBS as this sometimes will solve it. Note: You should not have to do this anymore, but we recommend to test before submitting any bug reports to them.
1. Select Application: Select the game you want to capture.
2. Use/set hotkey: Use hotkey to capture to capture current game. Some settings below alter how this is done. Stretch image to screen: Check if you want the game to be fullscreen on stream, but not on your own screen. Ignore aspect ratio: Ignore games aspect ratio. Capture mouse cursor: Uncheck if you do not want a mouse cursor. Useful for games played with keyboard only. Invert cursor on click: Invert the color of the cursor when you click something.
This is a screenshot of game capture in action with it's settings:
Hopefully after reading this through, you will have a better understanding of the features that OBS offers currently.